Office Chair Adjustment Examples for Better Posture
Proper office chair adjustment is the process of customizing your chair settings to fit your body, promoting better posture and reducing discomfort during long desk or gaming sessions. Ergonomic seating setup, the recognized industry term, covers five core adjustments: seat height, seat depth, lumbar support, backrest recline, and armrests. Getting all five right distributes pressure evenly across your body, keeps your spine in a neutral position, and cuts down on the muscle fatigue that builds up after hours at a screen. These examples of proper office chair adjustment give you a clear, step-by-step path from the floor up.
1. What is the correct seat height and how to adjust it?
Seat height affects every other adjustment you make. Set it wrong and your armrests, lumbar support, and desk alignment all fall out of sync. This is why seat height comes first in any correct office chair setup.
The target position is feet flat on the floor, knees bent at roughly 90°, and hips level with or slightly higher than your knees. This angle keeps blood flowing through your legs and reduces pressure on your lower back.
- Sit down and let your feet rest naturally on the floor.
- Adjust the seat up or down until your thighs are parallel to the ground or angled very slightly downward.
- Check that your knees are not higher than your hips. If they are, raise the seat.
- Confirm your feet are fully flat, not resting on your toes or heels.
Pro Tip: If your desk height is fixed and raising your chair lifts your arms above desk level, use a footrest rather than lowering the chair. Keeping arm-to-desk alignment correct matters more for long-term shoulder and neck health than having your feet flat without support.
2. How to adjust seat depth for proper thigh support
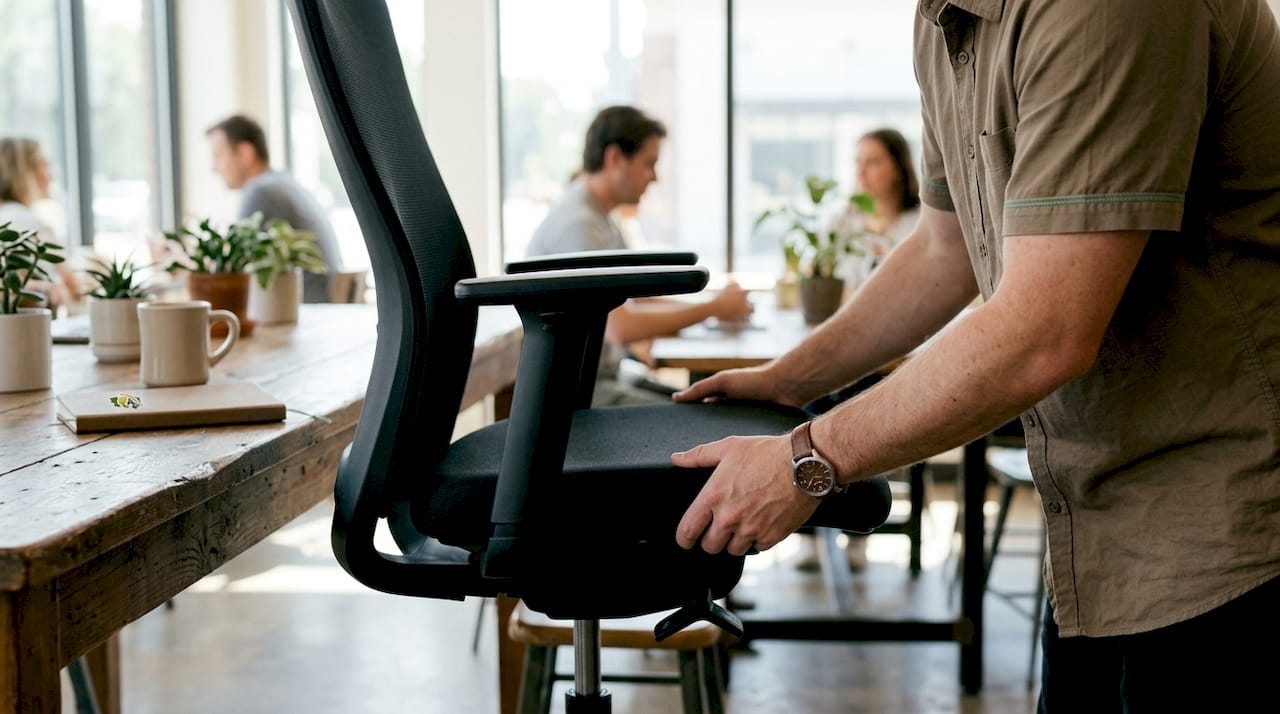
Seat depth is the distance between the backrest and the front edge of the seat pan. Most people never touch this setting, and that is a mistake.
The correct gap between the front edge of the seat and the back of your knees is 2–3 finger-widths. That gap keeps pressure off the backs of your knees and maintains healthy circulation in your lower legs. Without it, you either cut off blood flow or lose contact with your lumbar support.
- Too deep: You scoot forward to relieve knee pressure, which pulls your lower back away from the lumbar support entirely.
- Too shallow: Your thighs lack support, which shifts extra weight onto your lower back.
- Just right: Your back rests fully against the backrest while the seat supports most of your thigh length.
When seat depth is too deep, placing a firm cushion or lumbar roll behind your back is a practical fix for chairs without a sliding seat pan. This restores lumbar contact without forcing you to buy a new chair.
Pro Tip: Use the two-finger test every time you sit down. Slide two fingers between the seat edge and the back of your knee. If they fit snugly but not tightly, your depth is correct.
3. Examples of properly positioning lumbar support
Lumbar support targets the natural inward curve of your lower spine, specifically the L3–L5 vertebrae region. Place it too low and it pushes your tailbone. Place it too high and it jabs your mid-back. Neither position helps.
The right placement sits at or just above your belt line. Lumbar support should fill the curve of your lower back without forcing an exaggerated arch. Think of it as “present but not bossy.” You should feel gentle contact, not a push.
For chairs with adjustable lumbar height, start at belt level and move it up or down by one inch at a time. Sit back fully and check whether your lower back feels supported without your upper back being pushed away from the backrest. For chairs with adjustable lumbar depth, dial it in until the support fills the curve without creating tension.
Readers who work from home setups with basic chairs can find practical lower back support tips that work even without premium lumbar adjustment features.
4. What is the ideal backrest recline angle for desk work?
A perfectly upright 90° backrest is not the healthiest position for long sessions. It actually increases pressure on your lumbar discs compared to a slight recline.
The recommended recline range for active desk work is 100° to 110°. That slight backward tilt shifts some of your body weight onto the backrest, reducing the load your spinal muscles carry all day. The difference feels subtle but adds up over an eight-hour session.
- Locked upright (90°): Acceptable for short bursts of focused work, but creates static muscle tension over time.
- 100°–110° recline: The target zone for most desk and gaming work. Keeps spinal load low while maintaining screen visibility.
- Beyond 110°: Useful for breaks but too far back for active keyboard use.
Switching between upright and reclined positions every 20–30 minutes reduces spinal load and prevents the static muscle fatigue that builds up when you hold any single posture too long. Set a phone reminder if you tend to lock in and forget.
5. How to adjust armrests to avoid shoulder and neck strain
Armrests that are set too high are one of the most common causes of shoulder and neck tension at a desk. When the armrest pushes your elbow up, your shoulder shrugs. Hold that position for hours and your trapezius muscle stays contracted the entire time.
Proper armrest adjustment sets your elbows at a 90°–100° angle with your shoulders fully relaxed and dropped. Your forearms should rest lightly on the armrest, not bear your full arm weight.
- Height: Raise or lower until your shoulders drop naturally when your elbows rest on the pad.
- Width: Bring armrests close enough that your arms hang straight down from your shoulders, not splayed outward.
- Depth/angle: If adjustable, angle the pads slightly inward to match how your forearms naturally rest.
The most common mistake is using armrests as a shelf to lean on. That posture rounds your shoulders forward and compresses your neck. Armrests support, they do not carry. For a deeper look at how armrests affect your whole upper body, the Habitposture guide on armrest impact on posture breaks it down clearly.
Pro Tip: After adjusting armrest height, stand up and sit back down naturally without looking at the armrests. If your arms land on the pads without hunting for them, the height is right.
6. How posture habits reinforce your chair setup
Chair adjustments create the right conditions. Your habits determine whether those conditions actually help you. Ergonomics guidelines are clear that chair adjustment should facilitate movement, not enforce a rigid posture.
The best ergonomic chair setup in the world fails if you spend eight hours frozen in one position. Your body needs micro-movement. Shift your weight, recline slightly, lean forward briefly, then return to neutral. These small changes keep your muscles active and your circulation moving.
Desk workers who build posture habits alongside their chair setup see better results than those who rely on the chair alone. Habitposture’s guide on posture improvement for office workers covers practical movement habits that complement any ergonomic chair setup.
Key Takeaways
Proper ergonomic chair adjustment requires setting seat height first, then seat depth, lumbar support, backrest recline, and armrests in that order to maintain spinal alignment and reduce muscle strain.
| Point | Details |
|---|---|
| Seat height comes first | Set feet flat and knees at 90° before touching any other adjustment. |
| Seat depth protects circulation | Keep a 2–3 finger gap between the seat edge and the back of your knees. |
| Lumbar support fills, not pushes | Position lumbar at belt level to support the L3–L5 curve without forcing an arch. |
| Recline to 100°–110° | A slight backward tilt reduces lumbar disc pressure during long work sessions. |
| Armrests support, not carry | Set elbow angle at 90°–100° with shoulders fully relaxed and dropped. |
The adjustment order most people get wrong
I have watched people spend $800 on a chair and still end up with neck pain by 3 PM. The chair was not the problem. The setup order was.
Most people adjust whatever feels uncomfortable first. The armrests are poking them, so they fix those. Then they notice their back hurts, so they fiddle with the lumbar. Then they realize their feet are dangling. By the time they circle back to seat height, every other adjustment they made is now wrong because adjusting from the floor up is the only sequence that works. Change seat height last and you undo everything above it.
The other thing I have seen repeatedly: people trying to adjust their way out of a chair that simply does not fit their body. A 5’2" person in a chair built for someone 6’1" cannot fix that with knobs. A chair that does not fit your body size cannot be properly adjusted no matter how many controls it has. If you have maxed out every setting and still feel off, the chair is the problem, not your technique.
My honest advice: treat the adjustment sequence as non-negotiable, move your posture every 20–30 minutes, and be honest about whether your chair actually fits you.
— Thomas
Habitposture and your ergonomic setup
Getting your chair dialed in is the foundation. Keeping your posture strong throughout the day is the habit that makes it stick.
Habitposture is built for people who spend long hours at a desk or gaming station and want real support without the lecture. Whether you are fine-tuning your chair setup or looking for gear that helps your body hold better posture while you work, Habitposture has the tools and guides to back you up. Check out the full range of posture support products and find what fits your setup and your day.
FAQ
What is the correct seat height for an office chair?
Set your seat height so your feet rest flat on the floor and your knees form a 90° angle. Your hips should be level with or slightly higher than your knees.
How do I know if my seat depth is correct?
Slide two fingers between the front edge of the seat and the back of your knee. A snug 2–3 finger gap confirms correct depth and healthy leg circulation.
What angle should my backrest recline to?
The target recline for desk work is 100°–110°. This angle reduces pressure on your lumbar discs compared to a rigid upright position.
Where should lumbar support sit on my back?
Position lumbar support at belt level, targeting the L3–L5 vertebrae. The support should fill your lower back curve without pushing it into an exaggerated arch.
How often should I change my sitting position?
Switch between upright and gently reclined positions every 20–30 minutes. Regular movement prevents static muscle fatigue and reduces spinal load over long sessions.