Office Chair Lumbar Adjustment Guide for Desk Workers
Office chair lumbar adjustment is the process of correctly positioning and tuning the support pad to cradle the natural inward curve of your lower back, preventing fatigue and pain from prolonged sitting. If you spend eight or more hours at a desk, getting this right is not optional. Poor lumbar positioning is one of the most common causes of lower back pain in office workers, and most people never fix it because they skip the setup basics. This guide walks you through every step, from seat height to depth tuning, so your chair actually works for your spine.
What foundational adjustments must be made before lumbar support tuning?
Lumbar support fails when the seat itself is set up wrong. Think of it like painting a wall before fixing the cracks. No matter how well you position the lumbar pad, a poorly calibrated seat will undo all of it.
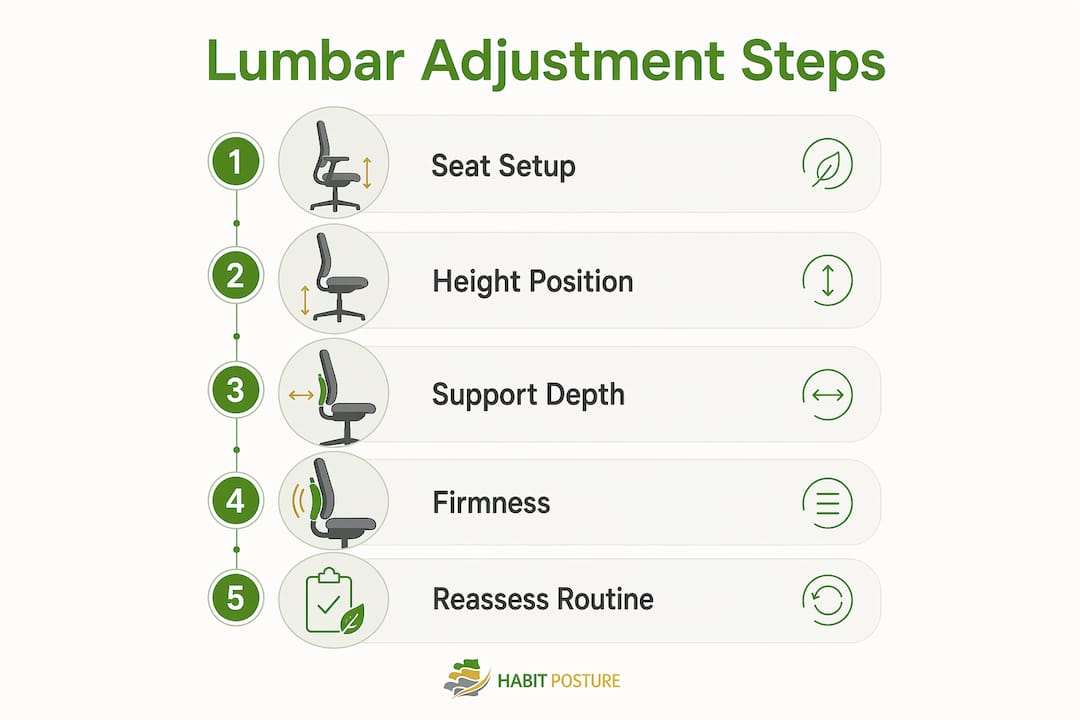
Follow these steps before touching your lumbar settings:
- Set your seat height first. Feet flat on the floor with knees at a 90–100 degree angle is the target. Your pelvis should be level with or slightly above your knees. This angle keeps your pelvis in a neutral tilt, which is the foundation your lumbar support builds on.
- Sit fully back in the seat. Slide your hips all the way to the rear of the chair. Perching on the front edge disconnects you from the backrest entirely, making any lumbar pad useless.
- Check your seat depth. You need 2–3 fingers of clearance behind your knees when seated fully back. A seat that is too deep forces you to slide forward, breaking contact with the lumbar support and collapsing your lower back curve.
- Confirm your pelvis is stable. Both sit bones should press evenly into the seat cushion. If you feel yourself tilting to one side, adjust until you are balanced.
Pro Tip: Before adjusting anything, sit in your chair for two minutes in your natural working posture. Notice where your back naturally rounds or arches. That honest baseline tells you exactly what the lumbar support needs to correct.
Getting these four steps right takes less than five minutes. Skipping them wastes every minute you spend on lumbar fine-tuning.

How do you find the correct lumbar support height?
The lumbar curve sits just above your belt line. That is where the support pad needs to land. Placing it anywhere else creates new problems instead of solving old ones.
Here is how to locate and set the right height:
- Find your natural curve. Sit fully back and run your hand down your lower back. You will feel a natural inward arch, roughly at the level of your belt. That hollow is your target zone.
- Position the pad at the curve, not above it. Lumbar support placed too high presses into the mid-back and creates tension between the shoulder blades. Placed too low, it pushes into the pelvis and tilts your hips backward.
- Adjust built-in lumbar height using the chair’s mechanism. Most ergonomic chairs with adjustable lumbar use a dial, lever, or sliding track. Move the pad up or down until it contacts the hollow of your lower back.
- For non-adjustable chairs, use a lumbar pillow. Position the pillow so its thickest point aligns with that inward curve. Secure it so it does not slip during the workday.
- Verify the fit by feel. Correct height produces a gentle cradling sensation. You should feel light, even contact across your lower back, not a point of pressure.
Pro Tip: Stand up, note where your belt line sits, then sit back down and use that reference to guide the pad placement. It is faster and more accurate than trying to feel the curve while already seated.
The lumbar curve’s natural position is consistent across most adults, which means this step is more straightforward than people expect. The mistake is almost always placing the pad too high.
How do you adjust lumbar support depth and firmness?
Depth is how far the lumbar pad protrudes into your back. Getting this wrong is the most common cause of shoulder tension and compensatory slouching at a desk.
Follow this sequence to dial in the right depth:
- Start with the minimum depth. Set the pad to its shallowest position. Sit fully back and notice whether you feel any contact with your lower back at all.
- Increase depth gradually. Turn the dial or adjust the mechanism one increment at a time. After each adjustment, sit back and breathe normally for 30 seconds.
- Stop at the first sign of gentle, continuous contact. The ideal sensation is cradle-like, not a push or a poke. Your lower back should feel supported, not shoved.
- Check your shoulders. If your shoulders are being pushed forward or you feel yourself hunching, the depth is too much. Dial it back one increment.
Correct lumbar depth feels like a firm handshake, not a shove. The moment you feel pressure rather than support, you have gone too far.
Excessive lumbar depth triggers a chain reaction: shoulders roll forward, the upper back rounds, and the neck strains to compensate. More support is not always better. The goal is the minimum depth that maintains your natural curve without effort.
For chairs with non-adjustable depth, a lumbar pillow gives you control. Fold a small towel behind the pillow to add depth, or remove it to reduce pressure. This low-cost method works well as a retrofit for budget chairs.
How do you troubleshoot lumbar support problems during the workday?
Even a perfectly set lumbar support drifts out of alignment as the day progresses. Spinal discs compress under load throughout the day, which changes how your back contacts the chair. A setting that felt right at 9 AM may feel wrong by noon.
Watch for these signs that your lumbar adjustment needs attention:
- Mid-back ache or tension between the shoulder blades. The pad is likely too high or too deep.
- Pressure at the base of your spine or tailbone. The pad has slipped too low and is pushing into the pelvis.
- Shoulders rolling forward without you noticing. Depth is too aggressive, or you have slid forward in the seat.
- Lower back fatigue despite using the support. You are perching instead of leaning. The pad only works when your back is in contact with it.
Reassess your lumbar settings every 60–90 minutes of sitting. This is not excessive. It is the realistic maintenance schedule that keeps support effective as your posture naturally shifts.
The habit of leaning into the backrest is just as important as the adjustment itself. Using the backrest consistently keeps the lumbar pad engaged with your spine’s curve. Many desk workers perch forward out of habit, especially during focused work, which completely disengages the support.
Fixed lumbar bumps on budget chairs present a specific problem. They cannot accommodate the range of spinal curves across different people. If your chair has a fixed bump that does not align with your curve, a properly positioned lumbar pillow is a better solution than forcing your posture to match the chair.
Pro Tip: Set a recurring timer for 60 minutes while working. When it goes off, do a quick posture check: are your feet flat, your hips back, and your lower back in contact with the support? A 10-second reset prevents hours of discomfort.
Key takeaways
Effective lumbar support requires correct seat setup first, precise pad placement at the natural lower back curve, and regular reassessment throughout the workday.
| Point | Details |
|---|---|
| Set the seat before the lumbar | Calibrate seat height and depth before touching lumbar settings, or adjustments will not hold. |
| Target the belt-line curve | Position the lumbar pad at the deepest inward curve of the lower back, just above the belt line. |
| Use minimal depth | Increase lumbar depth only until gentle contact is felt. Stop before shoulders shift forward. |
| Reassess every 60–90 minutes | Spinal compression changes your fit through the day. Quick rechecks maintain effective support. |
| Lean into the backrest | Lumbar support only works when your back stays in contact with it. Perching disengages it entirely. |
What I have learned about lumbar support after years at a desk
The biggest misconception about lumbar support is that it is a one-time setup. You adjust it once, and it works forever. That is not how spines or workdays operate.
I have watched people spend real money on ergonomic chairs and still end up hunching by 3 PM. The chair was not the problem. The habit was. They set the lumbar once during unboxing, never touched it again, and spent the rest of their days perching forward without realizing the pad was doing nothing.
The posture habit of leaning into the backrest is the part most guides skip. Lumbar support is not passive. It requires you to actually use the chair the way it was designed. That means sitting fully back, staying in contact with the support, and periodically checking that your setup still fits your body.
My honest take: treat lumbar adjustment the way you treat any physical habit. It takes repetition before it becomes automatic. The first week, you will forget to lean back. The second week, you will catch yourself sooner. By the third week, your body starts to prefer the supported position. That is when the chair starts doing its job.
The role of your lumbar curve in overall back health is significant enough that no amount of stretching or standing breaks fully compensates for eight hours of unsupported sitting. Get the setup right, build the habit, and your back will thank you by the end of the week.
— Thomas
Habitposture chairs built for real lumbar adjustment
Getting lumbar support right starts with a chair that actually gives you the controls to do it.
Habitposture’s high back ergonomic office chair is built for desk workers who need adjustable lumbar support that moves with them, not against them. The lumbar system lets you tune both height and depth so you can follow every step in this guide without compromise. Pair it with Habitposture’s posture improvement resources to build the habits that make your setup stick. Good gear and good habits work together. That is the Habitposture approach.
FAQ
What is the correct lumbar support position in an office chair?
The lumbar pad should sit at the deepest inward curve of your lower back, just above the belt line. Placing it too high creates mid-back tension; too low pushes into the pelvis.
How often should I readjust my lumbar support?
Reassess your lumbar settings every 60–90 minutes. Spinal discs compress throughout the day, which shifts how your back contacts the chair and changes what support level you need.
Can a lumbar pillow replace built-in lumbar support?
A lumbar pillow is an effective retrofit for chairs without adjustable support. Position the thickest point at your lower back curve and secure it so it does not slip during the workday.
Why does my lumbar support push my shoulders forward?
The depth is set too high. Reduce the depth one increment at a time until your shoulders sit naturally back and the contact feels like a cradle rather than a push.
How do I know if my seat depth is affecting my lumbar support?
Check the clearance behind your knees. You need 2–3 fingers of space between the seat edge and the back of your knees. A seat that is too deep forces you forward and breaks lumbar contact entirely.